Use the Vena Public API to build and automate a seamless connection between your custom Business Central instance and Vena.
Why use this feature?
If your organization uses a customized instance of Dynamics 365 Business Central, you can leverage the Vena Public API in partnership with Microsoft custom APIs, to connect your ERP to Vena. With the Vena Public API, you can import non-standard data and create your own objects and fields to suit your organization's unique needs.
Is the Vena API right for your needs? See the following for some examples of how the Vena API can help you:
- Upload large quantities of data (up to 25 MB) on a prescheduled basis.
- Move non-standard objects and fields specific to your ERP.
- Leverage the Vena API to connect your data if your organization uses the on-premise version of Business Central.
- Upload data from your custom objects.
Before you begin
To follow the instructions in this article, you will need at least Modeler access.
You will also need an application token from Vena. You can get your application token by following these instructions.
Every API endpoint requires you to know your region ID. Your region is the three characters in the URL that appear before vena.io. In this example, the region is us2.

How to
Use API extensions for Dynamics 365 Business Central to import data with the Vena Public API
These instructions are suitable for users seeking to use the Vena API to bring in data from Business Central. The process comprises four steps: retrieving your data with the Microsoft API, transforming your data to conform with the Vena API, sending your data to Vena via the Vena API and monitoring the status of your import via the Vena ETL.
Step 1: Retrieve your data with the Microsoft custom API
Before you import your data into Vena, you must set up a custom API page using an AL (Application Language) extension. From there, you can access the page to retrieve responses and make updates using the API. For more information on how to use Microsoft to develop a custom API, check out this article.
See below for two examples of how to send a GET request, one in Python and the other in Power FX:
Example 1 - Send GET request using Python
In the example below, we are using Python to send a GET request to one of the example endpoints provided in the Microsoft documentation:
import requests
import json

url = 'https://api.businesscentral.dynamics.com/v1.0/<user domain name>/api/<API publisher>/<API group>/<API version>/companies(<company id>)/carModel'

headers = {
    'Authorization': 'Bearer <your_access_token>',
    'Content-Type': 'application/json',
    'Accept': 'application/json'
}

response = requests.get(url, headers=headers)

if response.status_code == 200:
    data = response.json()
    print(json.dumps(data, indent=4))
else:
    print(f'Failed to retrieve data: {response.status_code}')
For the Python code block, replace:
<your_access_token><user domain name><API publisher><API group><API version><company id>with your own values.
The requests.get() function sends a GET request to your specified URL. If the request is successful (i.e., the status code is 200), the response data is printed to the console in a formatted JSON string.
NOTE
Ensure you have the necessary permissions and correct endpoint details to access the API.
Example 2 - Send GET request using Power FX
In the following example, we are using Power FX to send a GET request to one of the example endpoints provided in the Microsoft documentation:
// Define the URL and headers
var url = "https://api.businesscentral.dynamics.com/v1.0/<user domain name>/api/<API publisher>/<API group>/<API version>/companies(<company id>)/carModel";
var headers = Table(
    {
        Name: "Authorization",
        Value: "Bearer <your_access_token>"
    },
    {
        Name: "Content-Type",
        Value: "application/json"
    },
    {
        Name: "Accept",
        Value: "application/json"
    }
);

// Send the GET request
var response = HTTP.Get(url, headers);

// Check the response status code and process the response
if(
    response.StatusCode = 200,
    // On success: Parse and display the JSON response
    With(
        {
            parsedJson: JSON.Parse(response.Body)
        },
        JSON( parsedJson, JSONFormat.IndentFour )
    ),
    // On failure: Display the error message
    Concatenate("Failed to retrieve data: ", Text(response.StatusCode))
)
For the Power FX code block, replace:
<user domain name><API publisher><API group><API version\><company id><your_access_token>with your own values.
Sample response
Below is a simplified example of how the JSON response might look based on the structure of the Car Model table outlined in the Microsoft documentation. (Note that the response generated will be identical whether you are using Python or Power FX):
{
  "value": [
    {
      "SystemId": "12345-67890",
      "Name": "Model S",
      "Description": "Tesla Model S",
      "BrandId": "abc-def",
      "Power": 1000,
      "FuelType": "Electric"
    },
    {
      "SystemId": "98765-43210",
      "Name": "Model 3",
      "Description": "Tesla Model 3",
      "BrandId": "abc-def",
      "Power": 750,
      "FuelType": "Electric"
    }
    // ... more car models
  ]
}
The value key in this response contains an array of car model objects. Each car model object contains details like:
- SystemId
- Name
- Description
- BrandId
- Power
- FuelType
Step 2: Transform your data to conform with the Vena Public API
Once you receive your response, you must use a data analysis and structure tool like Pandas to flatten the JSON response.
In the following example, Python code is used to flatten the data:
data = {
    "value": [
        {
            "SystemId": "12345-67890",
            "Name": "Model S",
            "Description": "Tesla Model S",
            "BrandId": "abc-def",
            "Power": 1000,
            "FuelType": "Electric"
        },
        {
            "SystemId": "98765-43210",
            "Name": "Model 3",
            "Description": "Tesla Model 3",
            "BrandId": "abc-def",
            "Power": 750,
            "FuelType": "Electric"
        }
        # ... more car models
    ]
}

flattened_data = [list(item.values()) for item in data['value']]
print(flattened_data)
In the following example, Power FX code is used to flatten the data:
// Define the data
var data = Table(
    {
        SystemId: "12345-67890",
        Name: "Model S",
        Description: "Tesla Model S",
        BrandId: "abc-def",
        Power: 1000,
        FuelType: "Electric"
    },
    {
        SystemId: "98765-43210",
        Name: "Model 3",
        Description: "Tesla Model 3",
        BrandId: "abc-def",
        Power: 750,
        FuelType: "Electric"
    }
    // ... more car models
);

// Initialize an empty collection to hold the flattened data
ClearCollect(flattenedData, {});

// Iterate over each item in the data, collecting the values into the flattenedData collection
ForAll(
    data,
    Collect(
        flattenedData,
        {
            Values: [
                ThisRecord.SystemId,
                ThisRecord.Name,
                ThisRecord.Description,
                ThisRecord.BrandId,
                ThisRecord.Power,
                ThisRecord.FuelType
            ]
        }
    )
);

// The flattenedData collection now contains the flattened data
flattenedData
Here is how the data will look:
[
  ["12345-67890", "Model S", "Tesla Model S", "abc-def", 1000, "Electric"],
  ["98765-43210", "Model 3", "Tesla Model 3", "abc-def", 750, "Electric"]
]
In this format, the data appears as a list of lists. Each inner list represents a single row in a table. In this example, the inner list represents a car model with the values corresponding to specific fields:
- SystemId (
"12345-67890") - Name (
"Model S") - Description (
"Tesla Model S") - BrandId (
"abc-def") - Power (
1000) - FuelType (
"Electric")
At this point, the data should be embedded into the payload under the DATA variable, and ready to POST into Vena via the API.
Step 3: Send your data to Vena using the Vena Public API
Once your data is prepared in the correct format (string format, list of lists), you can use the Vena API to import your data into Vena. To do this, you must load the data into Vena using a function with a POST request back.
For more information on how to create your job, upload JSON data and start the job, check out this section of the Vena API documentation.
Create your payload
DATA = "[
   ['12345-67890', 'Model S', 'Tesla Model S', 'abc-def', 1000, 'Electric'],
   ['98765-43210', 'Model 3', 'Tesla Model 3', 'abc-def', 750, 'Electric']
]"

payload = {
    "input": {
        "data": DATA
    }
}
Send a POST request
In the following example, the function sends a POST request to a specific URL, handles the response and logs various messages based on the response:
def venaPost(payload):
    ETL_Template = "1241263834079423798"
    url = "https://eu1.vena.io/api/public/v1/etl/templates/{ETL_Template}/startWithData"
    apiUser = '1...20'
    apiKey = '7...e64ac'
    headers = {'Content-Type': 'application/json'}
    response = requests.post(url, auth=(apiUser, apiKey), headers=headers, json=payload, verify=False)

    if response.status_code == 200:
        try:
            data = response.json()
        except json.JSONDecodeError:
            logging.error("Failed to decode JSON from Vena. Raw response: {response.text}")
            data = response.content
    elif response.status_code == 413:
        print("Error: Data is beyond 25mb")
        data = response.content  # Preserving the response content in data variable
    else:
        logging.error("Request to Vena failed with status code: {response.status_code} and response text: {response.text}")
        data = None

    logging.info("Response from vena.io: %s", data)
    print(response.content)  # This can be removed if logging provides enough information
    return data

# Calling the function
venaPost(payload)
Below is an example of the same code, relayed in Power FX :
// Define the function venaPost
function venaPost(payload)
    // Initialize variables
    var ETL_Template = "1241263834079423798";
    var url = Concat("https://eu1.vena.io/api/public/v1/etl/templates/", ETL_Template, "/startWithData");
    var apiUser = "1...20";
    var apiKey = "7...e64ac";
    var headers = Table({Name: "Content-Type", Value: "application/json"});

    // Send the POST request
    var response = HTTP.Post(
        url,
        {
            Authentication: {
                Type: AuthenticationType.Basic,
                Username: apiUser,
                Password: apiKey
            },
            Headers: headers,
            Content: JSON(payload),
            IgnoreInvalidSSL: true
        }
    );

    // Handle the response based on status code
    If(
        response.StatusCode = 200,
        Try(
            {
                Result: JSON.Parse(response.Body),
                Error: Blank()
            },
            {
                Result: Blank(),
                Error: "Failed to decode JSON from Vena. Raw response: " & response.Body
            }
        ),
        If(
            response.StatusCode = 413,
            {
                Result: Blank(),
                Error: "Failed to decode JSON during CSV upload. Raw response: " & response.Body
            },
            {
                Result: Blank(),
                Error: "Request to Vena failed with status code: " & Text(response.StatusCode) & " and response text: " & response.Body
            }
        )
    )
Variable Initialization
In the response above, several variables are initialized via an assigned value. See below for additional context on the variable initialization:
- ETL_Template : This is the template ID that is created when you create a template upload in Vena. For information on how to set up a Vena template check out this article.
- url: This is a formatted string that constructs a URL using the ETL_Template variable. For more details on the url, check out this section of the Vena API documentation.
- apiUser and apiKey: These are authentication credentials.
- headers : This is a dictionary specifying that the content type of the request should be JSON.
Sending the POST Request
response = requests.post(url, auth=(apiUser, apiKey), headers=headers, json=payload, verify=False)See below for the parameters specified in the POST request:
- A POST request is sent to the url using the
requests.postmethod, - The
authparameter is used for basic authentication, - The
headersset the request headers, - The
jsonsends the payload as a JSON-encoded body, - And
verifydisables SSL certificate verification.
If response.status_code == 200
- The response is assumed to be a JSON object, and an attempt is made to parse it. If parsing fails, an error is logged and the raw response content is saved.
NOTE
lfresponse.status_codeis a 413 then the data is larger than 25MB. In this instance, we suggest that you revert to the endpoint, start with your file and push a .csv to that endpoint.
For any other status code, an error is logged, and data is set to None or Blank().
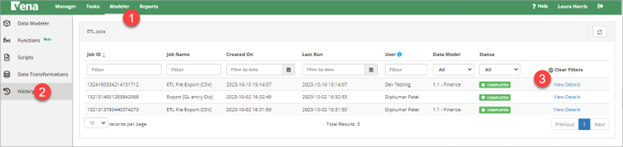
Step 4: Check the status of your ETL job
Once your post request is successful, you can now check the status of your ETL job.
-
Log into vena.io and navigate to the Modeler tab.
-
Select History from the sidebar. This opens the ETL Jobs page.
-
Locate your ETL job in the table and select View Details.
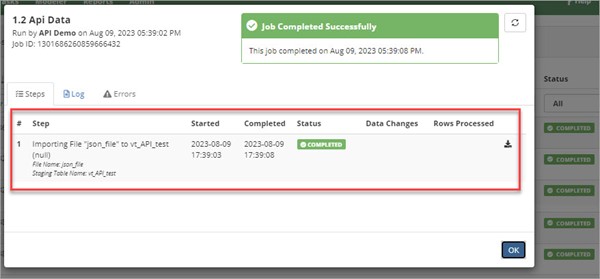
-
This opens the window for your selected job. From here, you can view the job status, start and completion time and the number of rows processed. If the job fails, you may review any corresponding errors to troubleshoot.
-
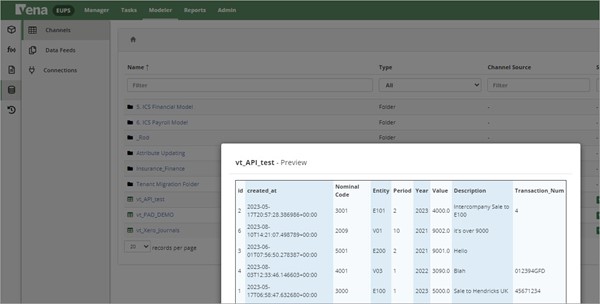
Below is an example of what the JSON data set will look like:
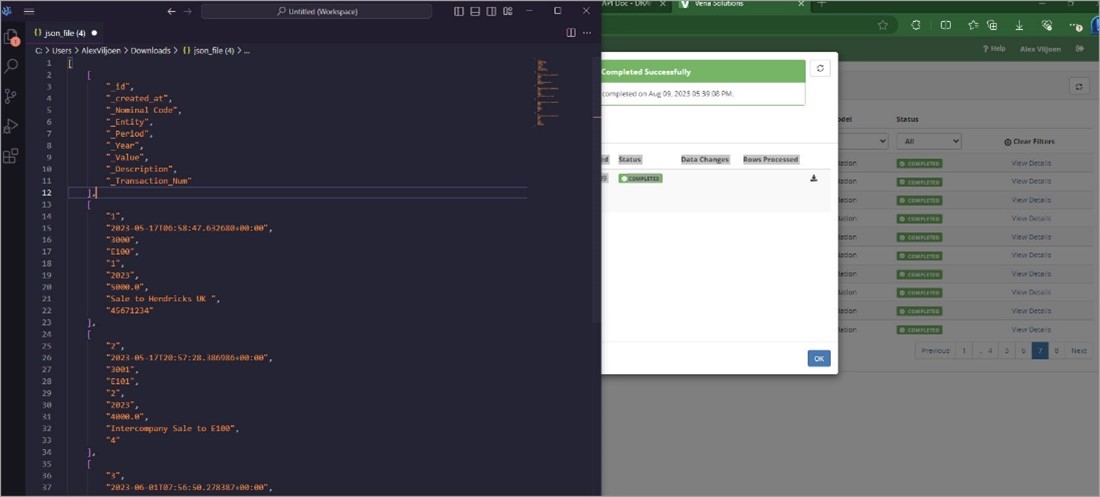
-
When you load the data into Vena for the first time, Vena will automatically set up a new Channel Source containing the data. The name of the channel will be the same as the ETL Template previously set up for this event.